| dungeonmouse |  |
| Copyright 2005 by dungeonmouse The cuff designs below are for permanent wear. The goal is to produce a system that permanently attaches the collar and cuffs to the slave and allows chains to be attached to the cuffs as desired. A secondary goal was to make the cuffs look medieval yet with a clean outer shape. The most common medieval cuff design available on the internet uses large flanges to attach the cuff halves together and as an attachment point for the chains. I sought a smoother outline on my designs. I realize "permanent" is a relative term. Any "permanent" cuff one blacksmith can build can be removed by another blacksmith given the right tools and sufficient patience. I defined "permanent" as requiring that the cuff be effectively destroyed in order to remove it. The best way I could design for making the cuffs permanent was by attaching the halves together with threaded rod. The cuff halves are clamped together and the holes for the rod are drilled and tapped all the way through. The cuffs halves are separated, placed on the slave and the threaded rod screwed into the holes. Excess threaded rod is cut off flush with the cuff. The only way to separate the cuff halves is by cutting through the threaded rod and the surrounding cuff material. The difficulty with this concept is the long hole that must be tapped for the threaded rod. I'm sure there are other ideas out there. If you have an idea for permanent cuff design, I'd like to hear it. For those not interested in wearing these cuffs for the rest of your life, please note that all the cuffs can be made removable by replacing the threaded rod with a conventional Allen screw. In this case, one half of the cuff would be tapped for the threads of the Allen screw and the other side drilled out to fit the body of the Allen screw. If you like these designs but are thinking only of removable cuffs, I would still value your comments. On the wrist and ankle cuffs, the chain attachment points are on the inside and outside of the wrist or ankle. Wrist and ankle cuffs are oval to fit closer to the skin. The collar would be circular allowing the chain attach points to be either front-back or left-right just by twisting the collar on the slave's neck. Since these cuffs are forever, the cuffs and collar must be custom fitted to each slave. I think the cuffs and the chains should be stainless steel. However, I don't know if stainless can be formed and welded to these shapes without considerable extra expense. Mild steel is easy to form and weld but it rusts. There are ways to slow down rusting. However, I am not aware of any fool-proof way to "rust-proof" mild steel, commercial claims notwithstanding. Zinc-plate leaves black marks on the skin which rubs off on everything you touch. Paint will protect the steel until it gets chipped or scratched. Powder coating the cuffs before attaching them is the most rust- and abrasion-resistant coating I am aware of but even it will eventually wear or scratch. I hope others with more knowledge in these areas can advise me on the best material and coatings. All the cuffs shown use 2 inch wide by 1/8 inch (50mm x 3mm) thick material for the basic cuff. The drawings show wrist cuffs with an inside diameter of 2 inches by 2.5 inches (50mm x 75mm). These happen to fit my wrists nicely. Ankle cuffs and collar would be made of the same material and the fastening blocks would be identical on all the cuffs and the collar. Only the inside diameter of the cuffs and collar would change. The cuffs and collar edges are flared and ground smooth so the cuffs will not injure the slave when under load. The cuff halves must also mate flush with no edges exposed for the same reason. I am posting these designs to get ideas. If you are a blacksmith, welder or machinist and have a better way to execute any of these designs, please contact me. If you have the ability to build any of these designs, please contact me. Even if you have not particular metal-working skills, I'd like to hear you thoughts and suggestions. If anyone is interested in using these designs for production and sale, I'll be happy to license them to you. My licensing fee for your unlimited use of a design is a set of cuffs and collar made to my size. |
||
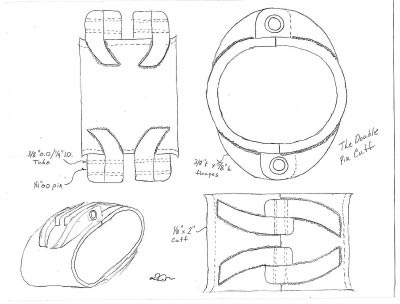
| The Double Pin Cuff | ||
 |
||
| This cuff uses two concentric pins to hold the two halves together. The first pin is made from a 3/8 inch (9mm) steel rod, threaded on the outside and drilled out to 1/4 inch (6mm) inside diameter. This pin (now actually a tube) is screwed into the cuff flanges and holds the two halves together permanently. There are actually four of these tube-pins for each cuff, two on each side of the cuff. The 1/4inch (6m) inner pin fits inside the tube-pin and is held in place by a small pin either screwed or pressed in from the side. The end link of a chain is placed over the 1/4 inch (6mm) pin as it is slid in place. The flanges are 3/8 inch x 5/8 inch (9mm x 15mm) rectangular steel bar, cut and bent to shape as shown. The flanges are curved when viewed from above purely for artistic reasons. They could be made straight for ease of building. I like this design. The concentric pin is an elegant solution to the problem and the flanges offer some artistic options. I could see the flanges being engraved to look like snake heads or something similar. The threaded holes in the flanges are shorter in length and larger in diameter than any of the other designs, making the tapping operation relatively easy. The flanges will be difficult to form, which is the main drawback I see to this design. Options: 1) Delete the tube-pins and use only the 1/4inch (6mm) pin thereby attaching the chains permanently to the cuff. 2) Press the 1/4 inch pin holding the chain into the tube-pin. This makes the chain very difficult to remove without the correct tools. You'd have to visit the blacksmith to alter the chain arrangement but that could be fun in and of itself. |
||
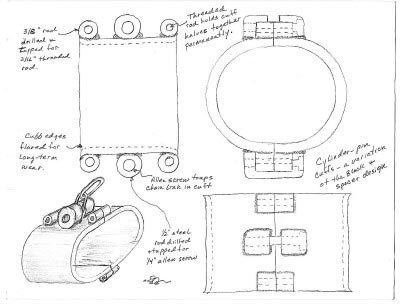
| The Block and Spacers Cuff | ||
| This cuff uses blocks welded to the cuff halves. To avoid machining the blocks after welding to the cuff, the chain slot is made by placing spacers between the cuff halves. The cuff halves are held together by threaded rods. The blocks and spacers are drilled and tapped for the threaded rod while the cuff halves are clamped together. Chains are attached to the cuff by placing the end link in the slot formed by the spacers and threading an Allen screw into the block. The blocks and spacers are rounded prior to assembly. This design has the smoothest exterior profile to my eye. I think the blocks might look a bit clunky but rounding them off should help the appearance. The main drawback to this design is the long holes that must be tapped for the threaded rod. The spacers will be fussy to make and there are four of them per cuff. Options: 1) The chains can be attached with a press pin as above. 2) The spacers could be eliminated by machining the blocks with a notch. If anyone has the tools to do this easily at reasonable cost, I'd like to hear from you. |
||
| The Cylinder-Pin Cuff | ||
 |
||
| This cuff is a variation of the Block and Spacer Cuff with the blocks replaced by steel rods drilled and tapped for the threaded rods and Allen screws. This design eliminates the spacers from the Block and Spacer design but isn't as smooth in its exterior lines. While the outline isn't as clean, I personally think this design looks more sinister than the Block and Spacer design. The cylinders could offer some artistic elements if they were engraved. I think tapping the cylinders may be easier as it can be done on a metal lathe, but I'm not sure about this. Options: 1) The large middle cylinder can be extended past the head of the Allen screw. The cylinder is then drilled for a small lock, allowing the Allen screw to be locked in place. This makes the chain impossible to remove without the key at the cost of a more cluttered design. The large cylinder is 12mm diameter for the metric among us. The small cylinders are 9mm diameter. 2) The large cylinder can be fitted with a press pin for chain attachment as described above for attaching the chains. |
||
| Tricia and Bob's Cuffs | ||
 |
||
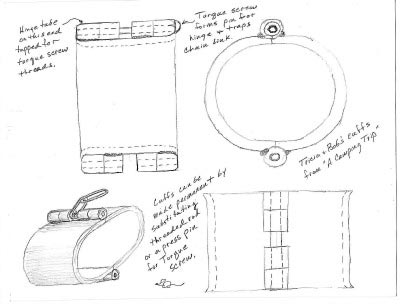
| This is the cuff described in my story, A Camping Trip, Part 1. The cuff halves are held together by a pin in the hinges. As in the story, these cuffs are removable since the torque screw that holds the chain to the cuff also holds the cuff halves together. This cuff is a very clean design but gives up the ability to make the cuff permanent while allowing chains to be removed and attached. I like the clean simplicity of this design. Options: 1) Make the chains and the cuff permanent by using a press pin or threaded rod in place of the torque screw. If I were making these for permanent wear, I would put chains between the inner hinges on the wrists and ankles, shackling the wrists and ankles permanently together. I would put steel rings in the outer hinges of wrists and ankles and in the two collar hinges. The cuffs would be permanent with attachment points for extra chains. |
||
| Diedra's Cuffs | ||
 |
||
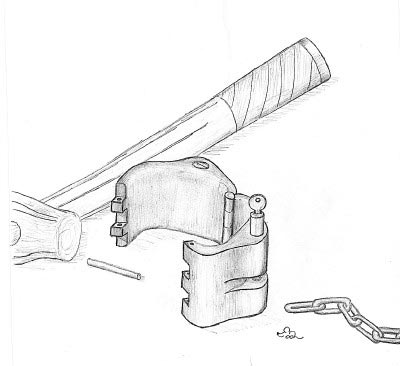
| This cuff is described in the Diedra stories. The hinge pins are pressed into the hinges, making the cuff permanent. The lock allows connecting chain to the cuff and requires a key to remove the chains. As drawn, the cuff would almost need to be cast then machined to final shape. Bronze might be a better material than steel as it is easier to cast and machine. There are bronze alloys with almost the same tensile strength as mild steel. The hinge joints would be particularly difficult to machine in any material, I think. But then I'm not a machinist; maybe there's a machinist out there who could make these cuffs in a trice. Also, the lock insert for attaching the chain would need to be fairly small. I searched the web and, while there are locks out there of this type, they are not particularly small. All in all, I like this cuff design very much. The outline is clean and smooth and the cuff just looks good. However, unless a blacksmith or machinist out there says otherwise, I think this design may be too complex to be practical. |
||
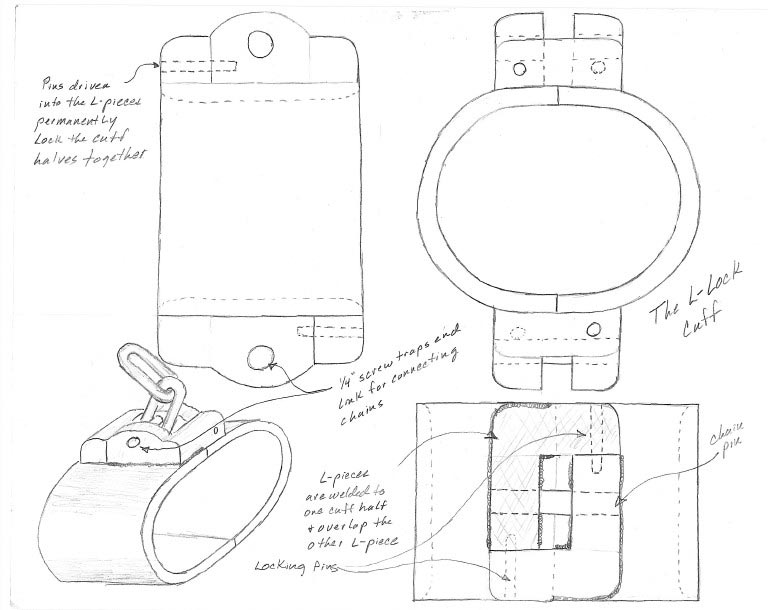
| The L-Lock Cuff | ||
 |
||
| The L-shaped blocks on this design are welded to the cuff halves. The L-blocks overlap when the cuff halves are pushed together and pins lock the L-blocks together. This design puts the locking pins in shear rather than in tension, making the pins much stronger. The portion of the L-block where the chain attaches is raised so a heavier chain can be attached without notching out the cuff itself. The height of the L-blocks could be reduced if lighter chain were used or if the cuff was notched under the chain slot. The cuff could be made removable by using allen screws for the locking pins. The chain attachment pin could also be either permanent or removable. I like the stronger features of this design. Putting the locking pins in shear also makes the machining work easier as the holes can be drilled after all the welding is done and the cuff has taken its final shape (metal changes shape when you weld it). I haven't made up my mind whether I like the taller profile of the chain slot on this design or the lower profile of the Block and Spacer Cuff. Eliminating the slot in the cuff material makes construction easier and gives an unbroken press of metal against your limbs, which I find very appealing. The higher profile will make the cuff clunkier looking but I'll wait until I have a prototype on my wrists to decide whether the clunky-ness overrides the ease of construction and the feel. The tallest portion of the L-blocks are 3/4 inch (18mm) thick. I'm attempting to build a prototype of this cuff. I'll make the L-blocks by welding square bar stock together then weld them onto the cuffs. I'm using a stick welder, so it will be like tuning a guitar with a pipe wrench. I'll report my success, or lack thereof, when I get something complete. |
||
| Home | Stories | Essays | Links | Gromet's Plaza | Selfbound.net |